Servlet 基础
项目的目录结构
本地 web 项目的目录结构
- HelloServlet 项目名
- resources
- 配置文件
- src
- java 程序
- web
- 静态资源 (html/css/js/图片/音频/视频…)
- WEB-INF
- lib
- 第三方 jar 包
- web.xml (web 项目的核心配置文件)
- lib
- resources
编译后的 web 项目的目录结构 (上服务器的)
- F:\WorkSpace\IDEA\Project\HelloServlet\out\artifacts\TestServlet_war_exploded
- 静态资源 (html/css/js/图片/音频/视频…)
- WEB-INF
- classes
- resources 中的所有配置文件
- src 中所有的 java 程序 (class 文件)
- lib
- WEB - INF 下的静态资源 (html/css/js/图片/音频/视频…)
- web.xml
- classes
什么是 Servlet
Servlet 是运行在服务端 (Tomcat) 的 Java 小程序,是 Sun 公司提供一套定义动态资源规范。从代码层面上来讲 Servlet 就是一个接口。
Servlet 的作用
用来接收、处理客户端请求,响应给浏览器的动态资源。在整个 Web 应用中,Servlet 主要负责接收处理请求、协同调度功能以及响应数据。我们可以把 Servlet 称为 Web 应用中的『控制器』。
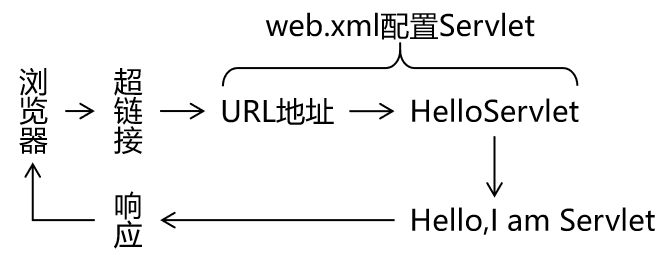
HelloServlet
目标
在页面上点击超链接,由 Servlet 处理这个请求,并返回一个响应字符串:Hello,I am Servlet.
思路
实现步骤
创建空项目 HelloServlet

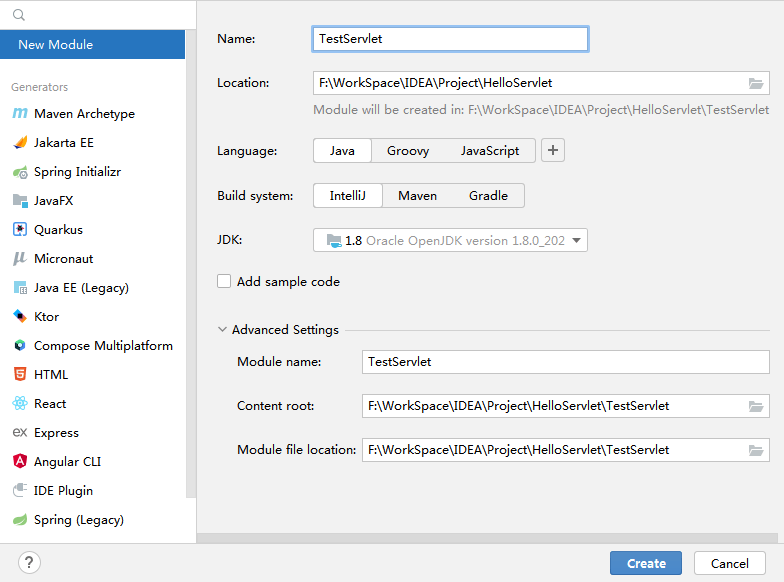
创建模块 TestServlet
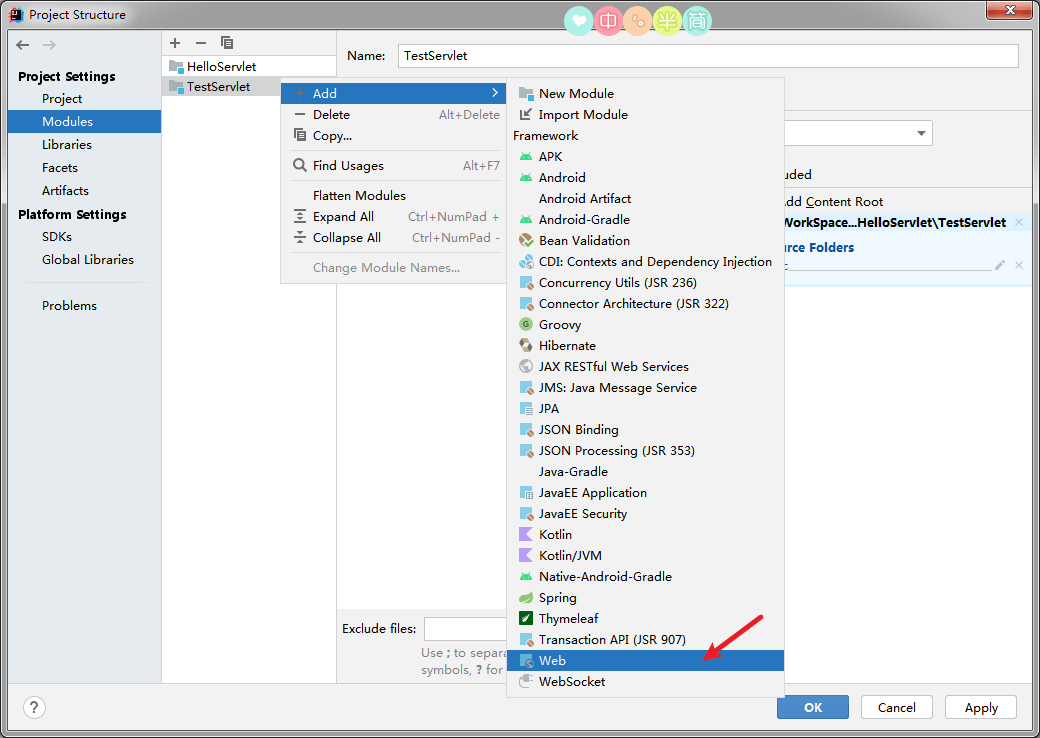
为模块添加 web application
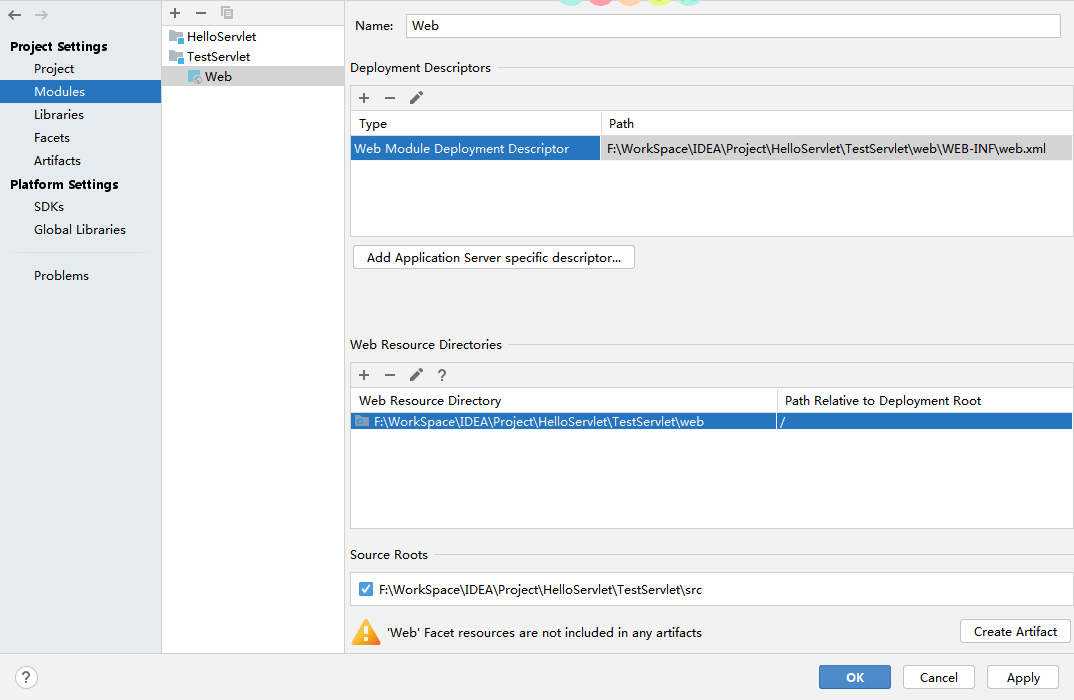
添加 web application 后,项目目录结构:

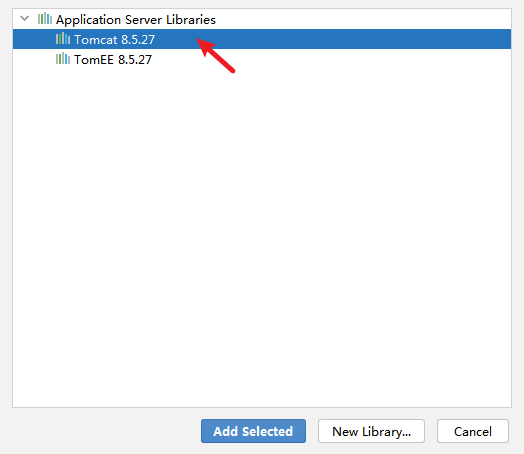
创建 HelloServlet
注意:为了可以使用 快捷创建 Servlet,请添加
Servlet或者Tomcat的依赖。
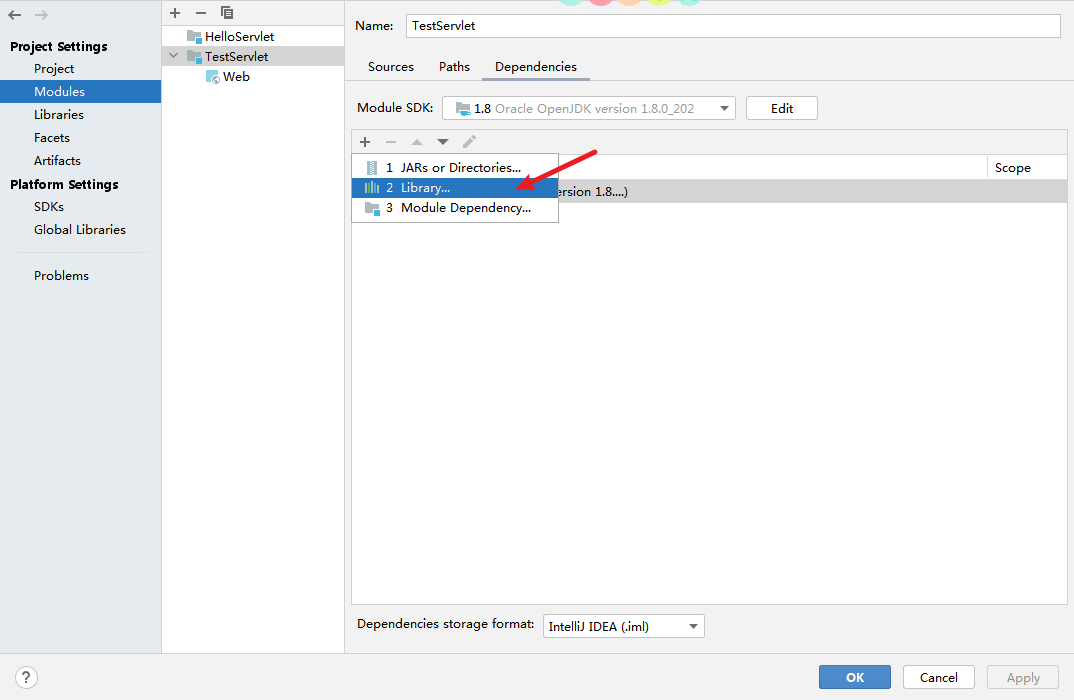
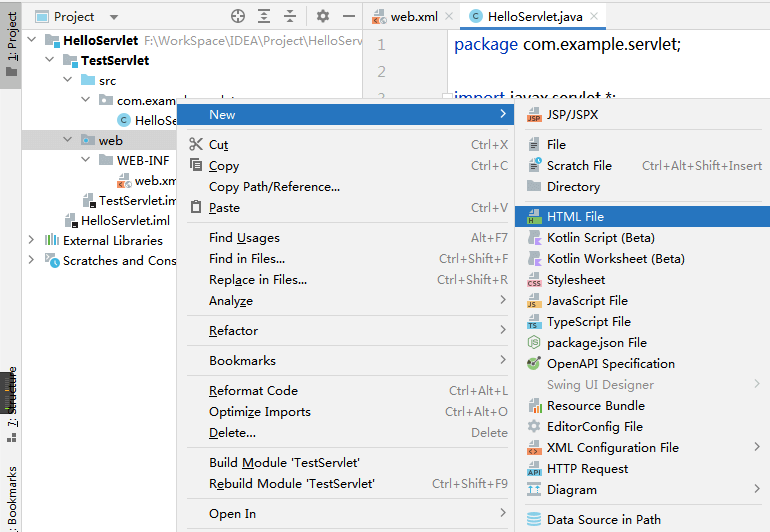
在 包上右击 : new -> Servlet


使用注解创建 HelloServlet : 会创建
HelloServlet.java文件,且在类上使用了注解:1
2
3
4
5
6
7
8
9
10
11
12
public class HelloServlet extends HttpServlet {
protected void doGet(HttpServletRequest request, HttpServletResponse response) throws ServletException, IOException {
}
protected void doPost(HttpServletRequest request, HttpServletResponse response) throws ServletException, IOException {
}
}不使用注解创建 HelloServlet : 会创建
HelloServlet.java文件,类上并没有使用注解。而是使用在配置文件中声明 Servlet 的方式,
web.xml:1
2
3
4
5
6
7
8
9
10
<web-app xmlns="http://xmlns.jcp.org/xml/ns/javaee"
xmlns:xsi="http://www.w3.org/2001/XMLSchema-instance"
xsi:schemaLocation="http://xmlns.jcp.org/xml/ns/javaee http://xmlns.jcp.org/xml/ns/javaee/web-app_4_0.xsd"
version="4.0">
<servlet>
<servlet-name>HelloServlet</servlet-name>
<servlet-class>com.example.servlet.HelloServlet</servlet-class>
</servlet>
</web-app>
点击查看:其它两种创建 Servlet 的方式
实现 Servlet 接口
1
2
3
4
5
6
7
8
9
10
11
12
13
14
15
16
17
18
19
20
21
22
23
24
25
26public class HelloServlet implements Servlet {
public void init(ServletConfig servletConfig) throws ServletException {
}
public ServletConfig getServletConfig() {
return null;
}
public void service(ServletRequest servletRequest, ServletResponse servletResponse) throws ServletException, IOException {
}
public String getServletInfo() {
return null;
}
public void destroy() {
}
}继承 GenericServlet
1
2
3
4
5
6
public class HelloServlet extends GenericServlet {
public void service(ServletRequest servletRequest, ServletResponse servletResponse) throws ServletException, IOException {
}
}
补全 HelloServlet 在 web.xml 中的配置
1 |
|
修改 HelloServlet.java :
1 | public class HelloServlet extends HttpServlet { |
创建入口 index.html 文件
1 |
|
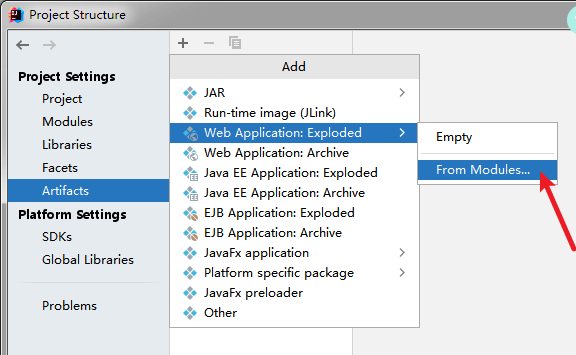
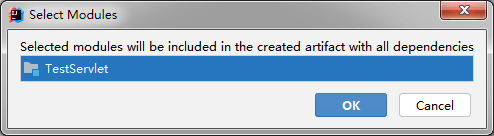
为该模块创建 Artifacts 条目
注意:有 Artifacts 条目后,Tomcat 实例配置那里的
Deployment 选项栏才会有可部署的 Artifacts 项目供选择。
创建 Artifacts 条目 :用于 Tomcat 运行实例 添加可启动的部署项目。
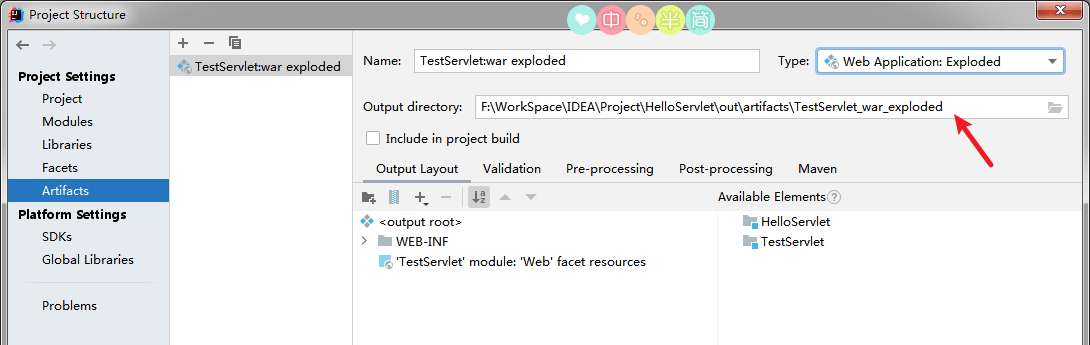
** 注意:** 上图中箭头指向处是 项目部署到 Tomcat 实例后,Tomcat 使用的 部署后的 web 项目,在本机硬盘上的实际存储位置。
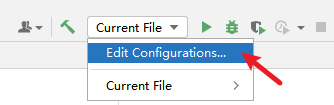
创建 Tomcat 运行实例配置
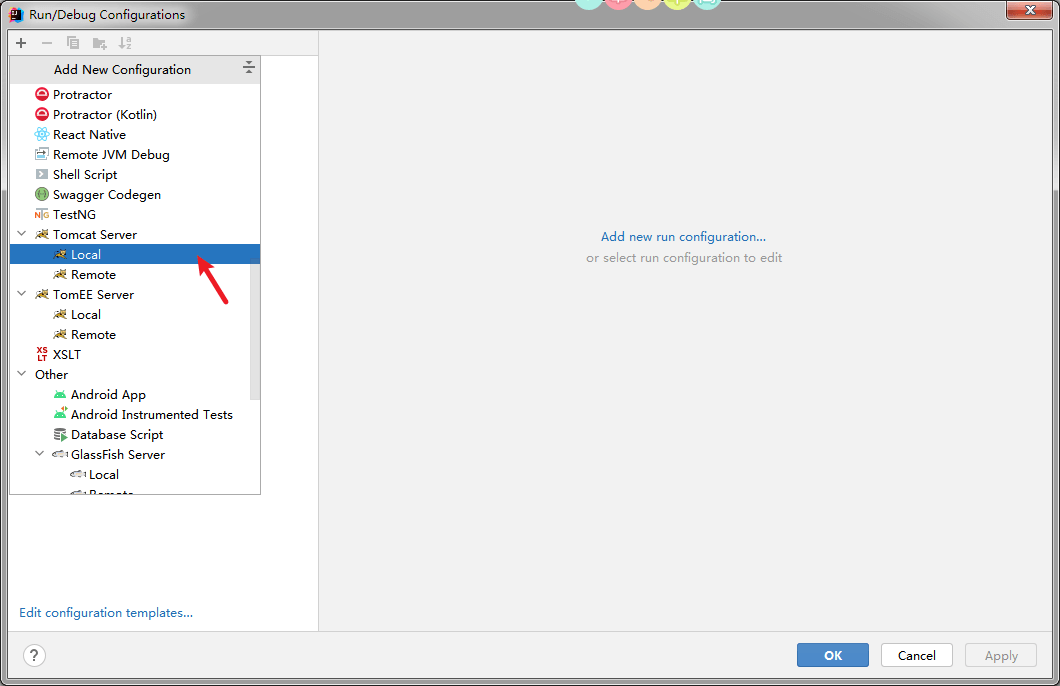
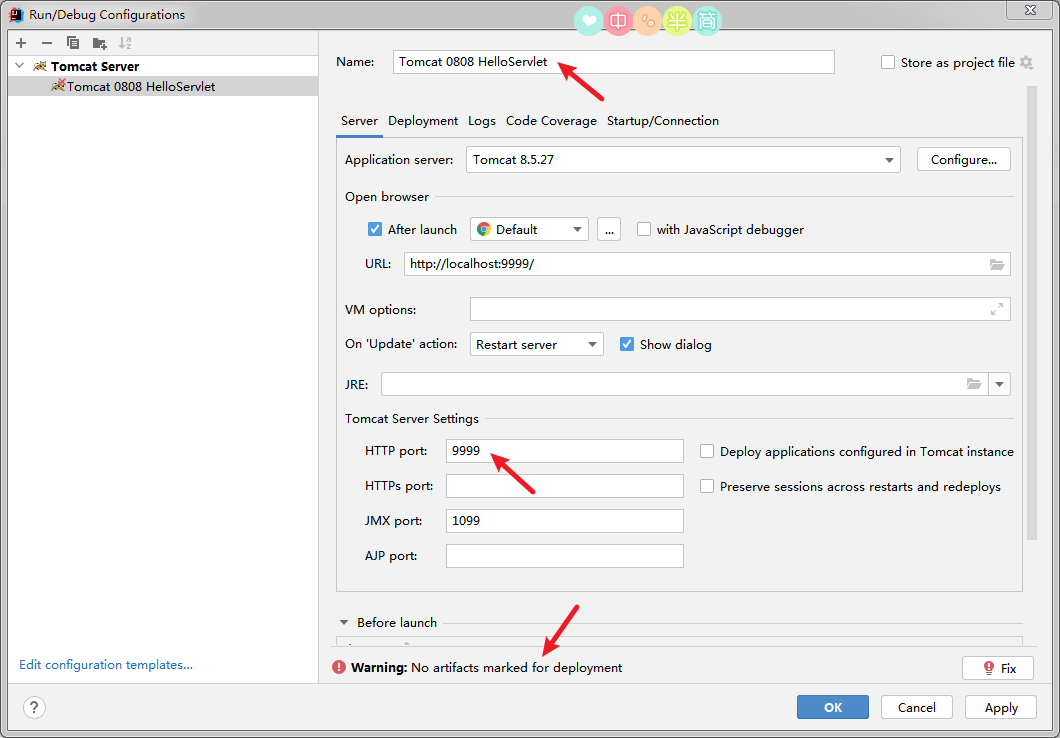
** 注意:** 上图中最下方箭头指向处的错误是指:还未对该实例部署项目。
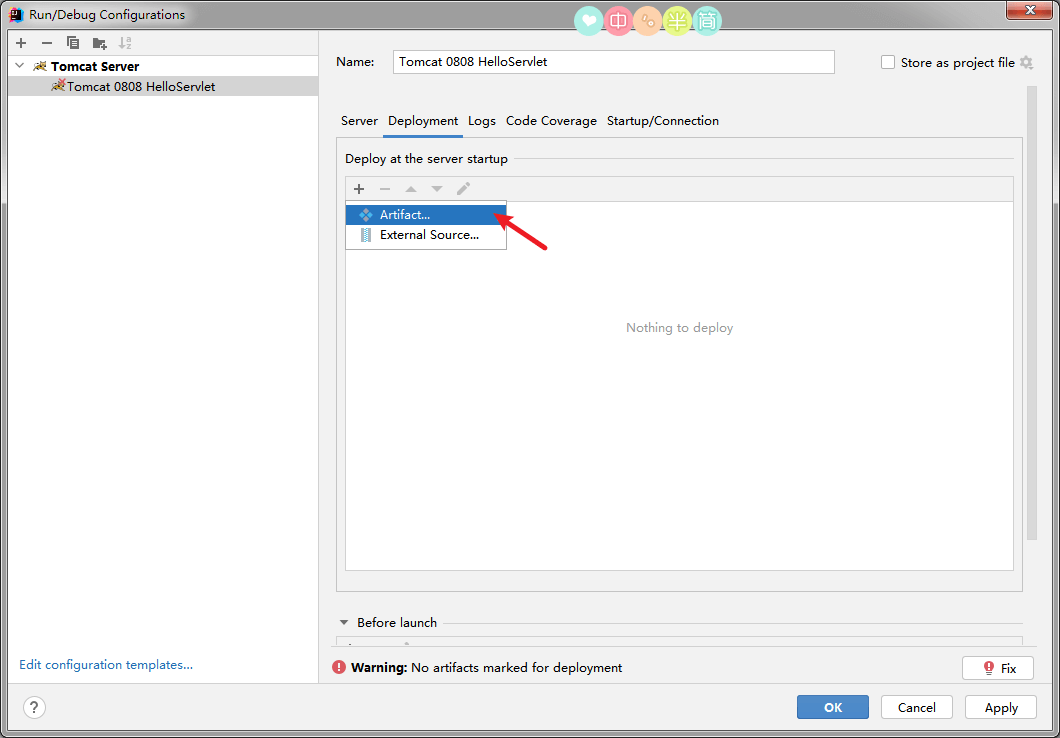
部署项目:
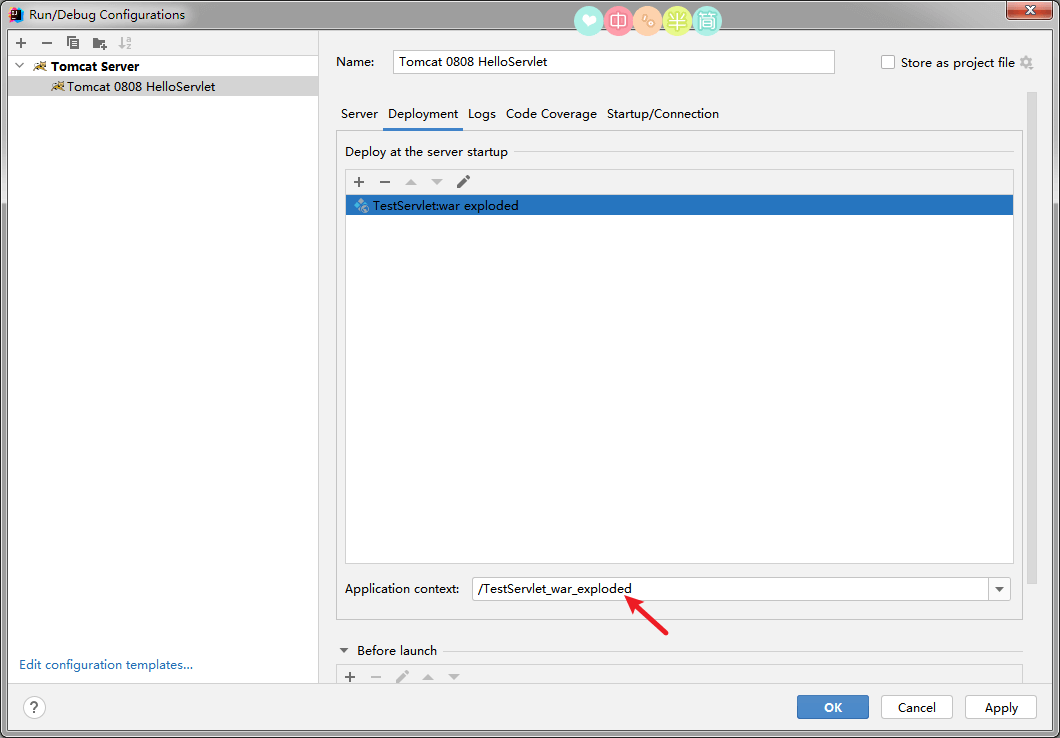
** 注意:** 上图箭头指向处:是 Web 应用 的 上下文。部署后项目的项目名。
启动该 Tomcat 实例

点击 访问 helloServlet:

Servlet 映射路径的配置
一个 Servlet 要么使用 配置文件方式 配置,要么使用 注解方式 配置,不能两者都使用。
使用注解方式配置的优势: 代码更加简单。
一般更推荐使用配置文件方式配置 Servlet,尤其是配置第三方框架中的 Servlet : 例如 SpringMVC 中的 DispatcherServlet,只能够使用配置文件方式进行配置。
使用注解配置
1 |
|
简写:
1 |
|
使用配置文件配置
web.xml :
1 |
|
三种映射路径
映射路径的作用
Servlet 的映射路径是提供一个让别人能够访问该 Servlet 的路径,例如 Servlet 的映射路径是"/helloServlet",那么在浏览器上访问该 Servlet 的路径是http://localhost:9999/项目部署名/helloServlet
注意: 一个 Servlet 可以配置多个映射路径,但是多个 Servlet 不能配置相同的映射路径。
1、完全路径匹配
访问当前 Servlet 的路径需要和配置的映射路径完全一致。
例如 Servlet 的配置是"/helloServlet",那么访问该 Servlet 的时候的路径也必须是http://localhost:9999/项目部署名/helloServlet才可以访问到
1 |
|
2、目录匹配
以 / 开始,以 * 结束,
配置 /* ,访问的路径可写成 /任意字符串,例:/a, /aa, /a/b/c 。
注: Servlet 里面用的不多, 但是过滤器里面通常就使用目录匹配。
1 |
|
3、扩展名匹配
以 * 开头,以 .扩展名 结束,能够匹配所有以 .扩展名 结尾的请求路径。
1 |
|
Servlet 的生命周期
类型关系
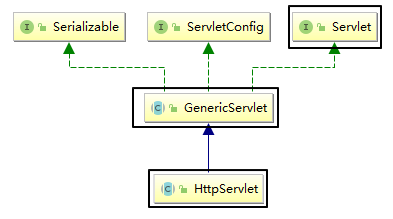
Servlet 接口有一个实现类是 GenericServlet,而 GenericServlet 有一个子类是 HttpServlet,我们创建 Servlet 的时候会选择继承 HttpServlet,因为它里面相当于也实现了 Servlet 接口,并且对一些方法做了默认实现,而且子类的功能会比父类的更加强大。
方法关系
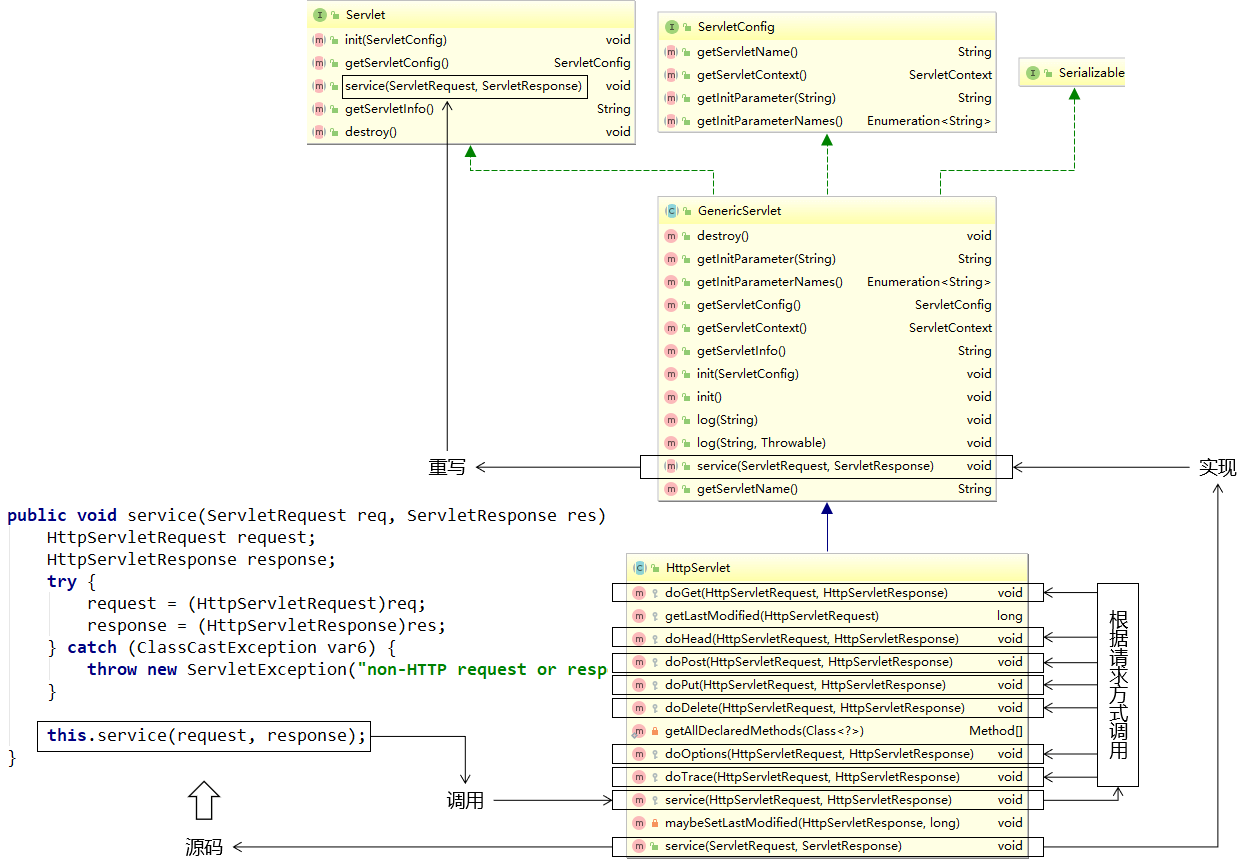
编写 Servlet 类继承 HttpServlet 的时候,只需要重写 doGet() 和 doPost() 方法就行了,因为 HttpServlet 重写了 service () 方法,在 service () 方法中判断请求方式,根据不同的请求方式执行 doXXX() 方法。
生命周期概述
- 应用程序中的对象不仅在空间上有层次结构的关系,在时间上也会因为处于程序运行过程中的不同阶段而表现出不同状态和不同行为 —— 这就是对象的生命周期。
- 简单的叙述生命周期,就是对象在容器中从开始创建到销毁的过程。
Servlet 容器
Servlet 对象是 Servlet 容器创建的,生命周期方法都是由容器调用的。
这里的 Servlet 容器是 Tomcat。
Servlet 生命周期的主要过程
1、Servlet 对象的创建:构造器
- 默认情况下,Servlet 容器第一次收到 HTTP 请求时创建对应 Servlet 对象。
- 容器之所以能做到这一点是由于我们在注册 Servlet 时提供了全类名,容器使用反射技术创建了 Servlet 的对象。
2、Servlet 对象初始化:init ()
- Servlet 容器创建 Servlet 对象之后,会调用一次 init (ServletConfig config) 方法。
- 作用:是在 Servlet 对象创建后,执行一些初始化操作。例如:读取一些资源文件、配置文件,或建立某种连接(例如:数据库连接)
- init () 方法只在创建对象时执行一次,以后再接到请求时,就不执行了
- 在 javax.servlet.Servlet 接口中,容器会向 public void init (ServletConfig config) 方法内传入 ServletConfig 的实例对象,这是获取 ServletConfig 的实例对象的根本方法。
3、处理请求:service ()
- 在 javax.servlet.Servlet 接口中,定义了 service(ServletRequest req, ServletResponse res) 方法处理 HTTP 请求。
- 在每次接到请求后都会执行。
- 同时容器将 ServletRequest 对象和 ServletResponse 对象传入。
4、Servlet 对象销毁:destroy ()
- 服务器重启、停止执行 或 Web 应用卸载时会销毁 Servlet 对象,在这之前,会调用 public void destroy () 方法。
- 此方法用于销毁之前执行一些诸如释放缓存、关闭连接、保存内存数据持久化等操作。
Servlet 对象的提前创建
有时候我们需要在 Servlet 创建的时候做一些资源加载等等耗时操作,所以如果 Servlet 在第一次接收请求的时候才创建的话必然会影响用户的访问速度,所以此时我们需要让 Servlet 提前创建,将 Servlet 的创建提前到服务器启动的时候。
通过修改 web.xml 中 Servlet 的配置可以实现:
1 | <servlet> |
注意:
<load-on-startup>标签应该在<init-param>标签的下方。
ServletConfig 接口
服务器会为每一个 Servlet 对象,配置一个唯一的一个 ServletConfig 对象
接口概览
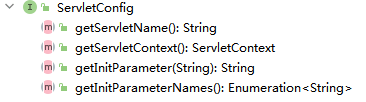
接口方法介绍
| 方法名 | 作用 |
|---|---|
| getServletName() | 获取 <servlet-name>HelloServlet</servlet-name> 定义的 Servlet 名称 |
| getServletContext() | 获取 ServletContext 对象 |
| getInitParameter() | 获取配置 Servlet 时设置的『初始化参数』,根据名字获取值 |
| getInitParameterNames() | 获取所有初始化参数名组成的 Enumeration 对象 |
ServletConfig 获取 Servlet 的初始化参数
我们可以在 web.xml 中对 Servlet 配置初始化参数,接下来可以在 Servlet 的 init方法 中通过 ServletConfig 实例获取配置的初始化参数的值。
web.xml :
1 | <servlet> |
HelloServlet2.java :
1 | public class HelloServlet2 implements Servlet { |
ServletContext 接口
服务器为其部署的每一个应用 (项目) 都创建了一个 ServletContext 对象。
ServletContext 属于整个项目的,该项目中的所有 Servlet 都可以共享同一个 ServletContext 对象。
获取 ServletContext 实例的两种方式
1、ServletConfig 接口的 getServletContext 方法
1 | ServletContext ServletContext = servletConfig.getServletContext(); |
2、HttpServletRequest 接口的 getServletContext () 方法
1 | ServletContext ServletContext = request.getServletContext(); |
ServletContext 获取 全局的 初始化参数
web.xml :
1 |
|
HelloServlet.java :
1 | public class HelloServlet extends HttpServlet { |
ServletContext 作为全局的域对象
什么是域对象
域对象就是在一定的作用域范围内进行数据共享的对象。
ServletContext 作为全局域对象可以在整个项目的所有动态资源 (包含所有 Servlet) 中进行数据共享。
ServletContext 作为域对象的 API
往全局域对象中存入数据 :
1 | servletContext.setAttribute("key",value); |
从全局域对象中取出数据 :
1 | Object value = ServletContext.getAttribute("key"); |
从全局域对象中删除数据 :
1 | Object value = ServletContext.removeAttribute("key"); |
例子
在 ServletDemo01 中往全局域对象中存入 "key" 为 "value" 的键值对,然后在 ServletDemo02 中从全局域对象中根据键 "key" 获取对应的值。
ServletDemo01 中的代码
1 | //1. 获取 ServletContext 对象 // ServletDemo01 继承自 HttpServlet OR GenericServlet |
ServletDemo02 中的代码
1 | //1. 获取 ServletContext 对象 |
servletContext 获取资源的真实路径
为什么需要用代码获取资源的真实路径
代码中需要获取项目中某个静态资源的路径,不是工程目录中的路径,而是部署到服务器后其在目录中的路径,项目部署到服务器后的路径会发生改变,所以我们需要使用代码动态获取资源在服务器上的真实路径。
获取资源真实路径的 API
1 | String realPath = servletContext.getRealPath("资源在项目里'web'文件夹内的路径"); |
例子
1 | String path = servletContext.getRealPath("/"); |
项目部署到服务器后的
根目录对应于工程目录里'web' 文件夹
HttpServletRequest 接口
HttpServletRequest 介绍
HttpServletRequest 是 ServletRequest 接口的子接口,封装了 HTTP 请求的相关信息。
浏览器请求服务器时会封装请求报文交给服务器,服务器接受到请求会将请求报文解析生成 request 对象。
由 Servlet 容器创建其实现类对象并传入 service (HttpServletRequest req, HttpServletResponse res) 方法中。
HttpServletRequest 作用
获取请求参数
什么是请求参数?
- 请求参数就是浏览器向服务器提交的数据。
浏览器如何向服务器发送数据?
① 附在 url 后面 (和 get 请求一致,拼接的形式),例如:
http://localhost:8080/loginServlet?userId=20&username=name
② 通过表单提交
1
2
3
4
5
6
7
8<form action="Servlet03" method="post">
text: <input type="text" name="text"><br>
password: <input type="password" name="password"><br>
hobby: <input type="checkbox" name="hobby" value="1">a
<input type="checkbox" name="hobby" value="2">b
<input type="checkbox" name="hobby" value="3 ">c<br>
<input type="submit" value="提交">
</form>使用 HttpServletRequest 对象获取
请求参数1
2
3// 一个 name 对应一个值
String userId = request.getParameter("password");
// 765311
2
3
4
5
6
7// 一个 name 对应一组值
String[] hobby = request.getParameterValues("hobby");
for(int i = 0; i < hobby.length; i++){
System.out.println("hobby "+i+"="+hobby[i]);
}
// hobby 0=1
// hobby 1=31
2
3
4
5
6
7
8// 迭代
Map<String, String[]> parameterMap = request.getParameterMap();
for (Map.Entry<String, String[]> stringEntry : parameterMap.entrySet()) {
System.out.println(stringEntry.getKey() +"=" +Arrays.toString(stringEntry.getValue()));
}
// text=[txt msg]
// password=[76531]
// hobby=[1, 3]
获取 url 地址参数
1 | // 项目部署到服务器的名字 OR 上下文路径 |
获取请求头信息
1 | String header = request.getHeader("User-Agent"); |
请求的转发
将请求转发给另外一个 URL 地址
1 | // 获取请求转发对象 |
注意:转发的资源 其根目录文件夹 为 项目部署到服务器后的目录的 根目录,即为
上下文 文件夹,同时也是 工程目录下的'web' 文件夹,转发资源的路径通常不带有 上下文的路径。
向 请求域 中保存数据
1 | // 将数据保存到 request 对象的属性域中,转发给 ReceiveServlet |
从 请求域 中获取数据
1 | // ReceiveServlet 从 request 属性域中获取数据 |
HttpServletResponse 接口
HttpServletResponse 介绍
- HttpServletResponse 接口是 ServletResponse 接口的子接口,封装了服务器针对于 HTTP 响应的相关信息。(暂时只有服务器的配置信息,没有具体的和响应体相关的内容)
- 由 Servlet 容器创建其实现类对象,并传入 service (HttpServletRequest req, HttpServletResponse res) 方法中。
HttpServletResponse 作用
使用 PrintWriter 对象向浏览器输出数据
1 | // 通过 PrintWriter 对象向浏览器端发送响应信息 |
设置响应头信息
1 | response.setHeader("Content-Type", "text/html;charset=UTF-8"); |
请求的重定向
1 | //注意路径问题,重定向一般需要加上部署到服务器的上下文 |
重定向的资源如果不以
'/'开头,则表示从http://localhost:9999/上下文/开始寻找资源。例如:
1
response.sendRedirect("success.html");
则会被重定向到:
http://localhost:9999/TestServlet_war_exploded/success.html重定向的资源如果以
'/'开头,则表示从http://localhost:9999/开始寻找资源。例如:
1
response.sendRedirect("/success.html");
则会被重定向到:
http://localhost:9999/success.html重定向一般需要加上部署到服务器的上下文
1
response.sendRedirect(request.getContextPath() + "/success.html");
则会被重定向到:
http://localhost:9999/TestServlet_war_exploded/success.html
请求的转发与重定向
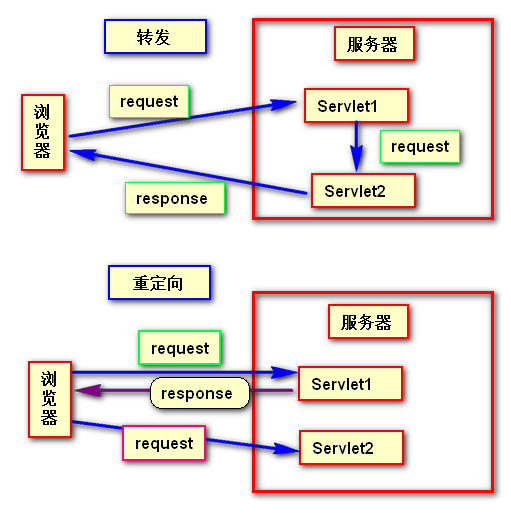
请求的转发
- 第一个 Servlet 接收到了浏览器端的请求,进行了一定的处理,然后没有立即对请求进行响应,而是将请求 “交给下一个 Servlet” 继续处理,下一个 Servlet 处理完成之后对浏览器进行了响应。在服务器内部将请求 “交给” 其它组件继续处理就是请求的转发。 对浏览器来说,一共只发了一次请求,服务器内部进行的 “转发” 浏览器感觉不到,同时浏览器地址栏中的地址不会变成 “下一个 Servlet” 的虚拟路径。
- HttpServletRequest 代表 HTTP 请求,对象由 Servlet 容器创建。转发的情况下,两个 Servlet 可以共享同一个 Request 对象中保存的数据。
- 转发的情况下,可以访问 WEB - INF 下的资源。
- 转发以
'/'开始表示部署到服务器上的 项目根路径;重定向以'/'开始表示主机地址 (端口号后)。
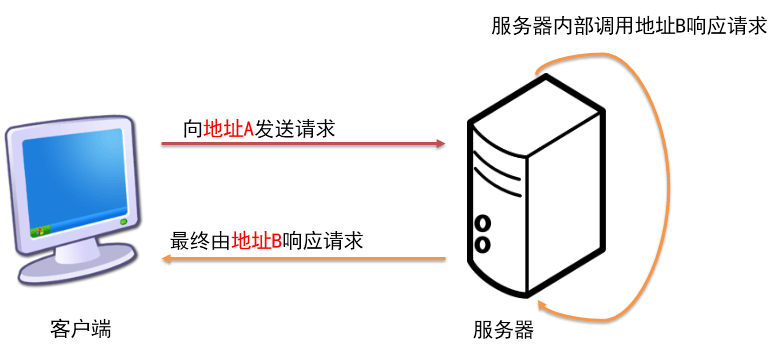
请求的重定向

第一个 Servlet 接收到了浏览器端的请求,进行了一定的处理,然后给浏览器一个特殊的响应消息,这个特殊的响应消息会通知浏览器去访问另外一个资源,这个动作是服务器和浏览器自动完成的。整个过程中浏览器端会发出两次请求,且在浏览器地址栏里面能够看到地址的改变,改变为下一个资源的地址。
重定向的情况下,原 Servlet 和目标资源之间就不能共享请求域数据了。
HttpServletResponse 代表 HTTP 响应,对象由 Servlet 容器创建。
重定向的响应报文的头
1
2HTTP/1.1 302 Found
Location: success.html
乱码问题
请求乱码
GET 请求(Tomcat7 及以下的需要处理)
- GET 请求参数是在地址后面的。
- 我们需要修改 tomcat 的配置文件。
- 需要在
server.xml文件修改Connector标签,添加URIEncoding="utf-8"属性。
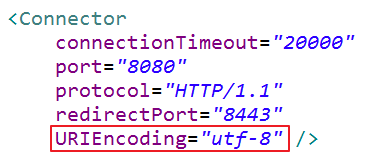
- 一旦配置好以后,可以解决当前工作空间中所有的 GET 请求的乱码问题。
POST 请求
post 请求提交了包含中文的请求体,服务器解析出现问题。
解决方法:在获取请求参数值之前,设置请求的解码格式,使其和页面保持一致。
1
request.setCharacterEncoding("utf-8");
POST 请求乱码问题的解决,只适用于当前的操作所在的类中。不能类似于 GET 请求一样统一解决。因为请求体有可能会上传文件。不一定都是中文字符。
响应乱码
向浏览器发送响应的时候,要告诉浏览器,我使用的字符集是哪个,浏览器就会按照这种方式来解码。
解决方法一:
1
response.setHeader("Content-Type", "text/html;charset=utf-8");
解决方法二:
1
response.setContentType("text/html;charset=utf-8");
注意:使用 response.setCharacterEncoding(“utf-8”),设置 reponse 对象将字符串写入到响应报文的编码为 UTF-8。只这样做是不行的,必须设置浏览器的解析用到的字符集。